Saturday, June 6, 2020

Linux Command Line Hackery Series: Part 1


In this concise article we will learn some basics of how to use Linux Command line, so lets get started.

Requirements:

1. An open Terminal in your Linux Box. I'm using Kali Linux 2.0
or you can check out this amazing website Webminal

Command:  ls
Syntax:         ls [flag(s)]
Function:      ls is short for list. ls command is used to list the contents of a directory these contents include files, folders, and links. ls has many optional flags as well, some of them are described below
Flags:    -a this flag is used to view hidden files that is those files whose names are preceded                      by a '.'(dot)
               -l  this flag is used to view file permissions, owner of the file, group of the owner, the                        file size, the modification date, and the filename. We'll talk more about it in later                            articles.

Command:  mkdir
Syntax:         mkdir dirname
Function:      mkdir is used to create a directory (or a folder) with the name which is followed by the command

now lets create a directory in our current directory named as myfiles, how would you do that?

mkdir myfiles

which command should we use in order to verify that the directory has been created in our current folder?

ls

this will list all the files and directories in our current folder. Do you see myfiles directory listed?

Command:  cd
Syntax:         cd path/to/directory
Function:      cd is short for change directory. It is used to navigate directories, or to make it clear it does the same thing as what double clicking on a folder do except it doesn't show you contents of the directory :(. In order to navigate or visit another directory we need to provide it's ABSOLUTE-PATH or RELATIVE-PATH you heard that, didn't ya?

Paths are of two types relative path or absolute path (also called full-path). Relative as the name suggests is relative to the current directory, so if you have to navigate to a folder within the current directory you'll just simply type cd directory_name. But what if you have to navigate to a directory which is the parent of current directory? Well it's easy just type cd .. (yes double dots, you noticed that .. and . thing when you typed ls -a, didn't you?). The double dots mean the directory above current directory (i,e the parent directory) and a single dot means the current directory (i,e the directory that I'm currently in). Now if you have to navigate two directories above current directory using relative path navigation you'll type

cd ../.. 

here .. means previous directory and another .. after slash (/) means the previous directory of the previous directory sounds confusing..!

The Absolute Path means full path to the file or folder which starts from root directory. Say I want to navigate to my home folder using absolute path, then I'll type:

cd /home/user

where user is the username
Now think of navigating to the myfiles folder from your home directory using the absolute path, it will be something like this:

cd /home/user/myfiles

Exercise: Create a directory project1 inside your home directory and inside the project1 directory create a file and a directory named index.html and css respectively. Then navigate to the css directory and create a style.css file inside it. At last navigate out of the css directory to home both using the relative and absolute path mechanisms.

[Trick: To get quickly out of any directory to your home directory type cd ~ [press Enter] or simply cd [press Enter]]

Command:  touch
Syntax:         touch filename
Function:      touch is a nifty little function used to create an empty file (actually it's used to change access time of a file but everyone has got bad habits :P ). You can create any type of empty file with the touch command. If you are a bit curious about touch read the manual page of the touch command using the man touch command.

Now lets create a few files inside of our myfiles directory

touch file1 file2 file3

The above command creates three empty files in our current directory named file1, file2, and file3.
How will you verify that it has indeed created these three files in your current directory? I won't answer this time.

Command:  echo
Syntax:         echo Hacker manufacturing under process
Function:      echo is used to display a line of text. By default echo displays a line of text on the terminal which is the standard output device (stdout for short). However we can redirect the output of an echo command to a file using > (the greater than symbol).
Now if we have to echo a line of text to a file, say file1 in our myfiles directory, we will type:

echo This is file1 > file1

The above command will echo the text "This is file1" to file1.

Command:  cat
Syntax:         cat filename [anotherfilename...]
Function:      cat stands for concatenate (not that puny little creature in your house). The main function of cat is to concatenate files and display them on your terminal (or in geeky terms stdout). But its also used to display the contents of a file on your terminal.

Let's display the contents of file1 in the myfiles directory that we echoed to it using the echo command, for that we'll type:

cat file1

Awesome I can see on black screen contents of my file (what if your terminals background is white?), looks like I'm becoming a hacker. In case you don't see it then I suggest you should give up the thought of becoming a hacker. Just kidding you might have missed a step or two from the above steps that we performed.

Now lets say that we want to add another line of text to our file using the echo command should we use the same greater than (>) symbol? No, if we want to add another line (which in geeky terms is to append a line) to our file using the echo command we have to use >> (two greater than symbols) like this:

echo Another line of text >> file1

now to check the contents of file1 we'll type:

cat file1

OK we wrote two lines inside of the file1.
Does it mean we have to add three greater than symbols to write third line? Oh! I didn't thought you'd be such a genius.

A single greater than symbol (>) means redirect the output of the preceding command to a file specified after the > symbol. If the file exists then overwrite everything that's in it with the new contents and if the file does not exist then create one and write to it the output of the preceding command. So if you had typed

echo Another line of text > file1

it would have overwritten the contents of the file1 with "Another line of text" and the line "This is file1" would no longer be present in the file.

Two greater than symbols (>>) mean that append (remember the geeky term?) the output of the previous command to the end of file specified after >>. Now if you want to add another line of text to file1, you won't use >>> rather you'll use >> like this:

echo Third line in file1 >> file1

This is it for today. But don't worry we'll learn more things soon.

More articles
  1. Hacking Programs
  2. Pentest Aws
  3. Pentest Training
  4. Hacking Youtube
  5. Pentest Services
  6. Pentest Open Source
  7. Pentest Wifi
  8. Pentest Hardware
  9. Hacking Link
  10. Pentest Smtp
  11. Pentest Nmap
  12. Hacking Resources
  13. Is Hacking Illegal
  14. Pentestbox

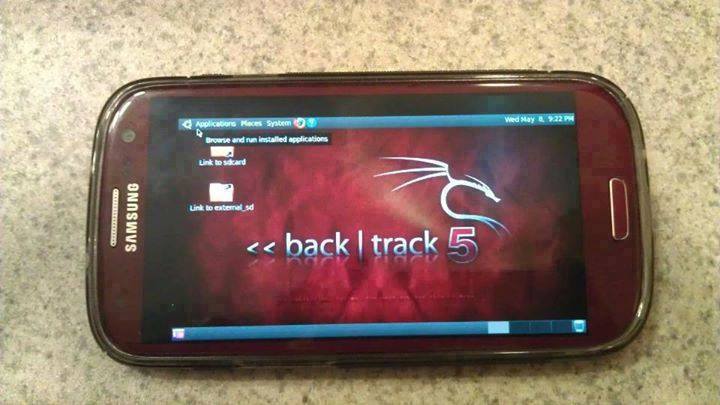
How To Install And Run Backtrack On Android

Guide you step by step to How to install and run Backtrack on android. As the Backtrack is also available with ARM architecture which makes it possible to run Backtrack on an ARM machine such as mobiles or tablets.
Recently, We are discussed Install and Run BackTrack on Windows. Android is the best OS for penetration testing. It designed for digital forensics and penetration testing or hacking tool. It comes with many more updated tools. As the Backtrack is also available with ARM architecture which makes it possible to run Backtrack on an ARM machine such as mobiles or tablets.
How To Install and Run Backtrack On AndroidRequirements
Step to Install and Run Backtrack On Android:
First of all extract the BT5-GNOME-ARM.7z. and copy the "BT5" folder and then put in your phone's root directory. Here mine phone is /sdcard. The root directory is different for different mobile devices.
  • Now install all the above apps Busybox, Android Terminal, Android Vnc.
  • After installing BusyBox application open it and wait until it finishes loading and then click on Smart install.
  • Now open the android terminal and type the following command:
    su cd /sdcard/BT5sh bootbtNOTE :- When you type su in terminal it will ask you for superuser request and you have to tap on Grant.
  • After this, type the following commands in terminal.
    export USER=rootvncpasswd
  • After entering vncpasswd the terminal will ask you to enter the password. Enter the desired password and hit enter.
  • Now type the following commands.
    tightvncserver -geometry 1280×720
  • The terminal emulator will create the localhost to connect it to VNC server. Now note the localhost port marked red below. Now minimize the terminal emulator.
  • Open the Android VNC and type the following settings.
Nickname : BT5
Password : your password here which you entered in terminal (step no.6)
Address : localhost
Port : 5906
NOTE: Make sure that your localhost's port matches with terminal's localhost. Here mine New 'X' desktop is localhost:6. You may be different. So, in VNC type Port 590X where the "X" is the localhost in the android terminal.
That's it now just tap on connect to run the Backtrack on your android. So in this way you successfully install and run backtrack 5 on android. If you face any problem feel free to discuss in below comments!
Related posts

  1. Pentest Free
  2. Pentest Network
  3. Hacking Vpn
  4. Hacking Books
  5. Pentest Ubuntu
  6. Pentesterlab
  7. Pentest Framework
  8. Pentest With Kali
  9. Hacking Online Games
  10. Pentest Website
  11. Hacker Google
  12. Pentest Vs Ceh
  13. Hacking Tools
  14. Hacking Bluetooth
  15. Rapid7 Pentest
  16. Hacking Websites
  17. Pentest Certification

TLS V1.2 Sigalgs Remote Crash (CVE-2015-0291)


OpenSSL 1.0.2a fix several security issues, one of them let crash TLSv1.2 based services remotelly from internet.


Regarding to the TLSv1.2 RFC,  this version of TLS provides a "signature_algorithms" extension for the client_hello. 

Data Structures


If a bad signature is sent after the renegotiation, the structure will be corrupted, becouse structure pointer:
s->c->shared_sigalgs will be NULL, and the number of algorithms:
s->c->shared_sigalgslen will not be zeroed.
Which will be interpreted as one algorithm to process, but the pointer points to 0x00 address. 


Then tls1_process_sigalgs() will try to process one signature algorithm (becouse of shared_sigalgslen=1) then sigptr will be pointer to c->shared_sigalgs (NULL) and then will try to derreference sigptr->rhash. 


This mean a Segmentation Fault in  tls1_process_sigalgs() function, and called by tls1_set_server_sigalgs() with is called from ssl3_client_hello() as the stack trace shows.


StackTrace

The following code, points sigptr to null and try to read sigptr->rsign, which is assembled as movzbl eax,  byte ptr [0x0+R12] note in register window that R12 is 0x00

Debugger in the crash point.


radare2 static decompiled


The patch fix the vulnerability zeroing the sigalgslen.
Get  David A. Ramos' proof of concept exploit here


Continue reading


Fluxion - Set Up Fake AP, Fake DNS, And Create Captive Portal To Trick Users Into Giving You Their Password


Fluxion is a security auditing and social-engineering research tool. It is a remake of linset by vk496 with (hopefully) less bugs and more functionality. The script attempts to retrieve the WPA/WPA2 key from a target access point by means of a social engineering (phishing) attack. It's compatible with the latest release of Kali (rolling). Fluxion's attacks' setup is mostly manual, but experimental auto-mode handles some of the attacks' setup parameters. Read the FAQ before requesting issues.
If you need quick help, fluxion is also avaible on gitter. You can talk with us on Gitter or on Discord.

Installation
Read here before you do the following steps.
Download the latest revision
git clone --recursive git@github.com:FluxionNetwork/fluxion.git
Switch to tool's directory
cd fluxion 
Run fluxion (missing dependencies will be auto-installed)
./fluxion.sh
Fluxion is also available in arch
cd bin/arch
makepkg
or using the blackarch repo
pacman -S fluxion

Changelog
Fluxion gets weekly updates with new features, improvements, and bugfixes. Be sure to check out the changelog here.

How it works
  • Scan for a target wireless network.
  • Launch the Handshake Snooper attack.
  • Capture a handshake (necessary for password verification).
  • Launch Captive Portal attack.
  • Spawns a rogue (fake) AP, imitating the original access point.
  • Spawns a DNS server, redirecting all requests to the attacker's host running the captive portal.
  • Spawns a web server, serving the captive portal which prompts users for their WPA/WPA2 key.
  • Spawns a jammer, deauthenticating all clients from original AP and lureing them to the rogue AP.
  • All authentication attempts at the captive portal are checked against the handshake file captured earlier.
  • The attack will automatically terminate once a correct key has been submitted.
  • The key will be logged and clients will be allowed to reconnect to the target access point.
  • For a guide to the Captive Portal attack, read the Captive Portal attack guide

Requirements
A Linux-based operating system. We recommend Kali Linux 2 or Kali rolling. Kali 2 & rolling support the latest aircrack-ng versions. An external wifi card is recommended.

Related work
For development I use vim and tmux. Here are my dotfiles

Credits
  1. l3op - contributor
  2. dlinkproto - contributor
  3. vk496 - developer of linset
  4. Derv82 - @Wifite/2
  5. Princeofguilty - @webpages and @buteforce
  6. Photos for wiki @http://www.kalitutorials.net
  7. Ons Ali @wallpaper
  8. PappleTec @sites
  9. MPX4132 - Fluxion V3

Disclaimer
  • Authors do not own the logos under the /attacks/Captive Portal/sites/ directory. Copyright Disclaimer Under Section 107 of the Copyright Act 1976, allowance is made for "fair use" for purposes such as criticism, comment, news reporting, teaching, scholarship, and research.
  • The usage of Fluxion for attacking infrastructures without prior mutual consent could be considered an illegal activity, and is highly discouraged by its authors/developers. It is the end user's responsibility to obey all applicable local, state and federal laws. Authors assume no liability and are not responsible for any misuse or damage caused by this program.

Note
  • Beware of sites pretending to be related with the Fluxion Project. These may be delivering malware.
  • Fluxion DOES NOT WORK on Linux Subsystem For Windows 10, because the subsystem doesn't allow access to network interfaces. Any Issue regarding the same would be Closed Immediately

Links
Fluxion website: https://fluxionnetwork.github.io/fluxion/
Discord: https://discordapp.com/invite/G43gptk
Gitter: https://gitter.im/FluxionNetwork/Lobby


More articles


Lockdoor-Framework: A PenTesting Framework With Cyber Security Resources


About Lockdoor-Framework
    Author: SofianeHamlaoui
   Tested on: Kali Linux, Ubuntu, Arch Linux, Fedora, OpenSuse and Windows (Cygwin)

   LockDoor is a Framework aimed at helping penetration testers, bug bounty hunters And cyber security engineers. This tool is designed for Debian/Ubuntu/ArchLinux based distributions to create a similar and familiar distribution for Penetration Testing. But containing the favorite and the most used tools by Pentesters. As pentesters, most of us has his personal ' /pentest/ ' directory so this Framework is helping you to build a perfect one. With all of that ! It automates the Pentesting process to help you do the job more quickly and easily.

Lockdoor-Framework installation:
   For now, Lockdoor-Framework supports Debian-based Linux distros (Kali Linux, ParrotSec, Ubuntu...), Arch Linux based distros (Manjaro, BlackArch, ArchStrike...), Fedora, OpenSuse, Cygwin on Windows.

   Open your Terminal and enter these commands:

You can watch detail here:

Lockdoor Tools contents 🛠️:
 * Information Gathering 🔎:
  • dirsearch: A Web path scanner
  • brut3k1t: security-oriented bruteforce framework
  • gobuster: DNS and VHost busting tool written in Go
  • Enyx: an SNMP IPv6 Enumeration Tool
  • Goohak: Launchs Google Hacking Queries Against A Target Domain
  • Nasnum: The NAS Enumerator
  • Sublist3r: Fast subdomains enumeration tool for penetration testers
  • wafw00f: identify and fingerprint Web Application Firewall
  • Photon: ncredibly fast crawler designed for OSINT.
  • Raccoon: offensive security tool for reconnaissance and vulnerability scanning
  • DnsRecon: DNS Enumeration Script
  • Nmap: The famous security Scanner, Port Scanner, & Network Exploration Tool
  • sherlock: Find usernames across social networks
  • snmpwn: An SNMPv3 User Enumerator and Attack tool
  • Striker: an offensive information and vulnerability scanner.
  • theHarvester: E-mails, subdomains and names Harvester
  • URLextractor: Information gathering & website reconnaissance
  • denumerator.py: Enumerates list of subdomains
  • other: other Information gathering,recon and Enumeration scripts I collected somewhere.
  • ReconDog: Reconnaissance Swiss Army Knife
  • RED_HAWK: All in one tool for Information Gathering, Vulnerability Scanning and Crawling
  • Dracnmap: Info Gathering Framework
 * Web Hacking 🌐:
  • Spaghetti: Spaghetti - Web Application Security Scanner
  • CMSmap: CMS scanner
  • BruteXSS: BruteXSS is a tool to find XSS vulnerabilities in web application
  • J-dorker: Website List grabber from Bing
  • droopescan: scanner, identify, CMSs, Drupal, Silverstripe.
  • Optiva: Web Application Scanner
  • V3n0M: Pentesting scanner in Python3.6 for SQLi/XSS/LFI/RFI and other Vulns
  • AtScan: Advanced dork Search & Mass Exploit Scanner
  • WPSeku: Wordpress Security Scanner
  • WPScan: A simple Wordpress scanner written in python
  • XSStrike: Most advanced XSS scanner.
  • SQLMap: automatic SQL injection and database takeover tool
  • WhatWeb: the Next generation web scanner
  • joomscan: Joomla Vulnerability Scanner Project
  • Dzjecter: Server checking Tool
 * Privilege Escalation ⚠️:
  • Linux 🐧:linux_checksec.sh
       linux_enum.sh
       linux_gather_files.sh
       linux_kernel_exploiter.pl
       linux_privesc.py
       linux_privesc.sh
       linux_security_test
       Linux_exploits folder
  • Windows Windows:   windows-privesc-check.py
       windows-privesc-check.exe
  • MySql:raptor_udf.c
       raptor_udf2.c
 * Reverse Engineering ⚡:
  • Radare2: unix-like reverse engineering framework
  • VirtusTotal: VirusTotal tools
  • Miasm: Reverse engineering framework
  • Mirror: reverses the bytes of a file
  • DnSpy: .NET debugger and assembly
  • AngrIo: A python framework for analyzing binaries (Suggested by @Hamz-a)
  • DLLRunner: a smart DLL execution script for malware analysis in sandbox systems.
  • Fuzzy Server: a Program That Uses Pre-Made Spike Scripts to Attack VulnServer.
  • yara: a tool aimed at helping malware researchers toidentify and classify malware samples
  • Spike: a protocol fuzzer creation kit + audits
  • other: other scripts collected somewhere
 * Exploitation ❗:
  • Findsploit: Find exploits in local and online databases instantly
  • Pompem: Exploit and Vulnerability Finder
  • rfix: Python tool that helps RFI exploitation.
  • InUrlBr: Advanced search in search engines
  • Burpsuite: Burp Suite for security testing & scanning.
  • linux-exploit-suggester2: Next-Generation Linux Kernel Exploit Suggester
  • other: other scripts I collected somewhere.
 * Shells 🐚:
  • WebShells: BlackArch's Webshells Collection
  • ShellSum: A defense tool - detect web shells in local directories
  • Weevely: Weaponized web shell
  • python-pty-shells: Python PTY backdoors
 * Password Attacks ✳️:
  • crunch : a wordlist generator
  • CeWL : a Custom Word List Generator
  • patator : a multi-purpose brute-forcer, with a modular design and a flexible usage
 * Encryption - Decryption 🛡️:
  • Codetective: a tool to determine the crypto/encoding algorithm used
  • findmyhash: Python script to crack hashes using online services
 * Social Engineering 🎭:
  • scythe: an accounts enumerator

Contributing:
  1. Fork Lockdoor-Framework:
    git clone https://github.com/SofianeHamlaoui/Lockdoor-Framework.git
  2. Create your feature branch
  3. Commit your changes
  4. Push to the branch
  5. Create a new Pull Request

Features 📙:
  • Pentesting Tools Selection 📙:
   Tools ?: Lockdoor doesn't contain all pentesting tools (Added value) , let's be honest ! Who ever used all the Tools you find on all those Penetration Testing distributions ? Lockdoor contains only the favorite (Added value) and the most used toolsby Pentesters (Added value).
   what Tools ?: the tools contains Lockdoor are a collection from the best tools (Added value) on Kali Linux, ParrotSec and BlackArch. Also some private tools (Added value) from some other hacking teams (Added value) like InurlBr, iran-cyber. Without forgeting some cool and amazing tools I found on Github made by some perfect human beigns (Added value).
   Easy customization: Easily add/remove tools. (Added value)
   Installation: You can install the tool automatically using the install.sh. Manually or on Docker [COMING SOON]
  • Resources and cheatsheets 📙 (Added value):
   Resources: That's what makes Lockdoor Added value, Lockdoor Doesn't contain only tools! Pentesing and Security Assessment Findings Reports templates (Added value), Pentesting walkthrough examples and tempales (Added value) and more.
   Cheatsheets: Everyone can forget something on processing or a tool use, or even some trciks. Here comes the Cheatsheets (Added value) role! there are cheatsheets about everything, every tool on the framework and any enumeration,exploitation and post-exploitation techniques.

Check the Wiki Pages to know more about the tool 📙:
Lockdoor-Framework's screenshots:
First Step
Lockdoor update
ROOT Menu
Information Gathering
Web Hacking
Exploitation
Reverse Engineering
Enc/Dec
Password Attacks
Shells
PrivEsc
Social Engineering
PSAFRT
Walkthroughs
About
Support the author:
   On Paypal: Sofiane Hamlaoui
   BTC Address: 

Related articles

Pointers Part 1: The Basics


So you're eager to learn about pointers but unfortunately you got stuck because they seemed to you terrible in nature? That's not true I know, but many of the people get confused when they arrive at the topic of pointers. Well pointers are the most important tools in C programming and are the one that can make you fly (unless you don't know how to ride over them). In this article we're going to learn basics of pointers.
Pointers are the varaibles that store addresses of other variables. Easy ain't it?
So lets start with the decleration of a pointer, pointer is decreleared as:
data_type *var_name;
e,g
int *pt;
well the astrisk(*) before the variable name is the thing that makes variable a pointer. So far so good now what?
Now lets say we want to store address of a variable in our pointer variable that seems pretty complex..!
Let's do it:
int number = 100;
int *pt = #
Is it really complex..?
what we are doing here is that we are first declaring and initializing a integer variable (number) with value of 100 and then we declare and initialize a pointer variable (pt) with the address of number variable. Now pt (pointer variable) contains the address of number (integer varaible). So what? Now we can use this pointer variable to change the value of number variable. Is this some kind of Magic? Maybe. Lets' do it:
*pt = 200;
what we have done here is that we De-referencing the pt variable with the asterisk (*) and then assigned it the value of 200 now the number variable contains 200. Isn't it a magic? De-referencing is used for accessing the value of the variable towards which our pointer is pointing simple. So lets write a full program of what we have learned so far.
/*Pointer Basics: Creating and Using Pointers*/
#include<stdio.h>
int main(void){
  int number = 100;
  int *pt = &number;
  printf("Value of 'number' is: %d", number);
  printf("Address of 'number' is: %p", pt);
  *pt = 200;
  printf("New value of 'number' is: %d", number);
  return 0;
}
What this whole program did was it created a integer variable and a pointer to integer variable and then printed out the value and address of the 'number' variable and after that we De-referenced the pointer variable so that we can access the value to which our pointer variable is pointing and changed the old 100 value with new 200 value and at last we printed that out. Easy isn't it?
But do you know that you can get the address of a variable even by using ampersand (&) operator? Lemme show you how. I'll declare and initialize a variable 'var' and then print it to screen using ampersand (&) operator:
int var = 10;
printf("Address of 'var' is %p\n", &var);
the last statement here will print out the address of 'var' not value so that means it is equal to this statement:
int *pt = &var;
printf("Address of 'var' is %p\n", pt);
here we first assigned the address of 'var' to pointer variable 'pt' and then printed out the address of 'var' using the pointer variable (pt).
So lets write another program that will wrap up this part of 'Pointer Basics':
/*Pointer Basics Part 1: Program 2*/
#include<stdio.h>
int main(void){
   int var = 10;
   int *pt = &var;
   printf("The Value of 'var' is: %d\n", var);
   printf("De-referencing: *pt = %d\n", *pt);
   printf("Ampersand: The Address of 'var' is %p\n",  &var);
   printf("pt = %p\n", pt);
   return 0;
}
So that's the end of first part watch out for the next part in which we'll tighten our grip on pointers and get ready for some Advanced '*po(inter)-fo'.

Related word


  1. Hacking Growth
  2. Pentestmonkey
  3. Pentest Web Application
  4. Pentest Vpn
  5. Pentest Tools For Windows
  6. Hacking Tutorials
  7. Hacking Jacket
  8. Pentest Tools For Windows
  9. Pentest Ubuntu
  10. Hacking Gif

"I Am Lady" Linux.Lady Trojan Samples


Bitcoin mining malware for Linux servers - samples
Research: Dr. Web. Linux.Lady

Sample Credit:  Tim Strazzere

MD5 list:

0DE8BCA756744F7F2BDB732E3267C3F4
55952F4F41A184503C467141B6171BA7
86AC68E5B09D1C4B157193BB6CB34007
E2CACA9626ED93C3D137FDF494FDAE7C
E9423E072AD5A31A80A31FC1F525D614


Download. Email me if you need the password.

Related word


  1. Pentest Tools Github
  2. Hacking Hardware
  3. Pentestmonkey
  4. Hacking Attack
  5. Hacking
  6. Pentest Usb
  7. Pentest Hardware

Hacking All The Cars - Part 2


Connecting Hardware to Your Real Car: 

 I realized the other day I posted Part 2 of this series to my youtube awhile ago but not blogger so this one will be quick and mostly via video walkthrough. I often post random followup videos which may never arrive on this blog. So if you're waiting on something specific I mentioned or the next part to a series its always a good idea to subscribe to the YouTube. This is almost always true if there is video associated with the post.  

In the last blog we went over using virtual CAN devices to interact with a virtual car simulators of a CAN network This was awesome because it allowed us to learn how to interact with he underlying CAN network without fear of hacking around on an expensive automobile. But now it's time to put on your big boy pants and create a real CAN interface with hardware and plug your hardware device into your ODB2 port. 

The video I created below will show you where to plug your device in, how to configure it and how to take the information you learned while hacking around on the virtual car from part1 and apply it directly to a real car.   

Video Walk Through Using Hardware on a Real Car


As a reference here are the two device options I used in the video and the needed cable: 

Hardware Used: 

Get OBD2 Cable:
https://amzn.to/2QSmtyL

Get CANtact:
https://amzn.to/2xCqhMt

Get USB2CAN:
https://shop.8devices.com/usb2can


Creating Network Interfaces: 

As a reference here are the commands from the video for creating a CAN network interface: 

USB2Can Setup: 
The following command will bring up your can interface and you should see the device light color change: 
sudo ip link set can0 up type can bitrate 125000

Contact Setup: 
Set your jumpers on 3,5 and 7 as seen in the picture in the video
Sudo slcand -o -s6 /dev/ttyACM can0 <— whatever device you see in your DMESG output
Ifconfig can0 up

Summary: 

That should get you started connecting to physical cars and hacking around. I was also doing a bit of python coding over these interfaces to perform actions and sniff traffic. I might post that if anyone is interested. Mostly I have been hacking around on blockchain stuff and creating full course content recently so keep a look out for that in the future. 

More articles
  1. Pentest Nmap
  2. Pentest Security
  3. Hacking Youtube
  4. Hacking Link
  5. Rapid7 Pentest
  6. Pentest Environment
  7. Pentest Tools Free
  8. Hacking Browser
  9. Hacker Forum
  10. Pentesting And Ethical Hacking
  11. Pentest Firewall
  12. Hacking Images
  13. Pentest Azure
  14. Pentest Keys
  15. Pentest Android App